Friday, February 28, 2020

Summer Cards Part 2!


Here are the second set of cards I made in that snowstorm yesterday !

Step 1 : Card base


  • Cut a piece of Elizabeth Craft Designs White Soft Finish Cardstock to 11” x 5 1/2” and fold in half to make a 5 1/2” square card.
  • Cut a dark blue cardstock to 5 1/4'' square.
  • Cut a patterned cardstock (here is tone on tone dots pattern) to 5" square.
  • Using Elizabeth Craft Designs Stitched Circles #1116 die set, cut a red circle with the 2rd biggest die.
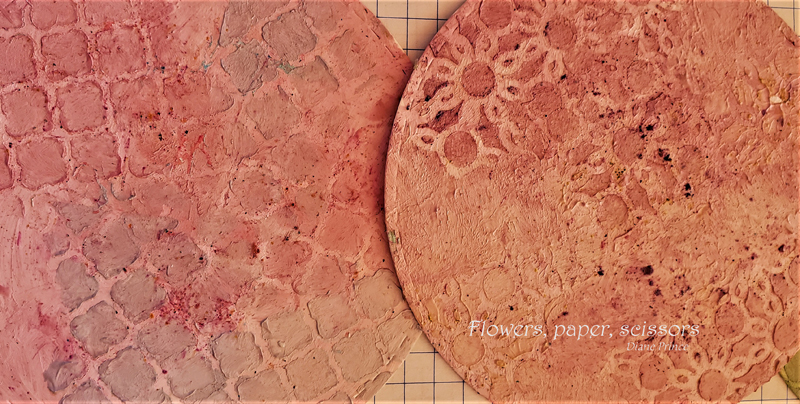
  • Using the same die, die cut the 3rd biggest die in a mixed media background (see tutorial with Infusion Stains and Gesso "Backgrounds are going wild" Feb 28th)
  • Put some Double Sided Adhesive Tape on the back of each layer and adhere one on top of the other.

Step 2 : Whale

  • On the back of some red cardstock and some Elizabeth Craft Designs White Soft Finish Cardstock , put a piece of Clear Double Sided Adhesive also from Elizabeth Craft Designs.
  • Die cut all the pieces of the die set Whale #1747 also from The Under The Sea collection - Elizabeth Craft Designs using the cardstock previously doubled with adhesive.
  • Tap the belly of the whale into some Clear Versamark and sprinkle some Seth Apter Blizzard Baked Texture Embossing Powder. Use a heat tool to melt the powder.
  • On the back of the whale, with a make-up sponge, use some Prima Art Alchemy Old Denim Metallic Wax to shade the cardstock.
  • Adhere all the pieces on the card base as shown in the picture below.


For a final touch, I added a googly eye on the whale. As for the previous cards, I choose to die cut everything twice so I can make 2 cards.

I hope you enjoyed this tutorial and come back later for more !


Products used on those cards:


Summer cards !


Good Friday everyone ! What a snowstorm we had yesterday !!! I felt like making summer cards and that is funny since it looked more like Christmas time !

I have to say that the new Joset Van De Burgt dies and stamps collection (Under The Sea) from Elizabeth Craft Designs have made this so much fun. 

So I hope you enjoy this simple tutorial.


Step 1 : Card base

  • Cut a piece of Elizabeth Craft Designs White Soft Finish Cardstock to 11” x 5 1/2” and fold in half to make a 5 1/2” square card.
  • Cut a light blue cardstock to 5 1/4'' square.
  • Cut a patterned cardstock (here is a strikes pattern) to 5" square.
  • Using Elizabeth Craft Designs Stitched Squares #1118 die set, cut a dark blue square with the 3rd biggest die.
  • Using the same die and some Elizabeth Craft Designs White Soft Finish Cardstock die cut the 4th biggest die.
  • Put some Double Sided Adhesive Tape on the back of each layer and adhere one on top of the other.


Step 2: Lighthouse
  • Choose 5 colors of cardstock that match the patterned cardstock (here I picked some dark blue, grey, light blue, yellow and green).
  • On the back of each color, put a piece of Clear Double Sided Adhesive from Elizabeth Craft Designs.
  • Die cut all the pieces of the die set Lighthouse #1754 also from The Under The Sea collection - Elizabeth Craft Designs using the cardstock previously doubled with adhesive.


  • Adhere all the parts as shown in the picture below.
  • Add some Crushed Papaya from the Nuvo Amber Glow set of Glitter Markers on the window of the lighthouse.
  • Add some Silver Mist from the Nuvo Midnight Shadows set of Glitter Markers on the 2 birds.


And here you have it ! As long as I was making one card, I thought I would double the fun by cutting everything twice and make two cards !

Products used on those cards:


Backgrounds are going wild !

I was inspired by Joset Van De Burgt new dies and stamps collection (Under The Sea) with Elizabeth Craft Designs to find a new way to make backgrounds for nautical scenery.  Searching for new ways to make such backgrounds, I started to play with white Gesso and some ink powders from miscellaneous brands making. What a surprise I was in for !

Here some of my experiments :

I used Elizabeth Craft Designs Stitched Circles dies set #1116 to die cut medium size circles in some 110 LB Soft Finish Cardstock. In this first trial, I used some Shimmer Powder from Tonic (Atlantis Burst); I sprinkled some on the dry cardstock and with a spatula, I scooped some of the white Gesso on to a plastic cup.


With a cheap brush from the Dollar Store, I pounced some Gesso on to the powder. I added some Gesso until I had kind of an ocean look.


I thought it was to greenish...so I got my Blue Blitz  and I sprinkled some on top of my green. Again, with the brush I added some Gesso. The color wasn't showing up all that much. but than I decided to sprinkle some blue powder directly into my Gesso.


To give more texture to my project, I decided to make myself a stencil using a die from Tonic Studios - Classic Quatrefoil Floral Blooms Die Set # 1333e and 110 LB Soft Finish Cardstock from Elizabeth Craft Designs.


Back to my project, I used some tinted Gesso with the Blue Blitz Powder and my brush and applied it through the stencil, here and there on the circle.


This was really nice and so fun to make....


...I couldn't stop with the green and blue...but I decided to try some other powders and made myself an other stencil...using this time Tonic Studios Classic Quatrefoil - Sunflower Array Die Set #1335e


Here some other backgrounds I made:


Come back soon to see what I did with those backgrounds !


Wednesday, February 26, 2020

Mixed media lighthouse


How lovely is that lighthouse from The Under The Sea Elizabeth Craft Designs new dies collection! I have made a first interpretation of this die that doesn't look as naive as the design is meant to be done. Nothing is wrong with the way it was intended to be done and I will post some other versions of this die that are more conventional. But for now here's my take on this gorgeous die set.

STEPS:

Step 1 : Card base
  • Cut a piece of White Soft Finish Cardstock to 11” x 5 1/2” and fold in half to make a 5 1/2” square card.
  • Cut a 5 1/2” square out of watercolor paper or heavy cardstock, adhere to the card base.

  • Using some light patterned paper, cut a 6” x 6” sheet in to strips and than, in to squares.

  • Glue the squares (overlapping them) onto the the card base with some liquid glue or Mod Podge.

Step 2 : Mixed Media sky

  • Sprinkle some Powder stains onto the background in the top part.
  • With a paint brush, apply some white Gesso.  Add Powder stains to you liking.

Step 3 : Mixed Media sand

  • With a pallet knife, apply some Glass Bead Gel on the lower part of the card.
  • Spray some Distress Oxide (Vintage Photo) and integrate with the pallet knife to give texture.

Step 4 : Lighthouse
  • Out of the Elizabeth Craft Designs Lighthouse #1754 die set, die cut the lighthouse (2 X) and the birds (1 X each) using some 110 LB White Soft Finish Cardstock.
  • Adhere the to lighthouse on top of each other.
  • Using a finger dubber, shade the lighthouse with some Distress Oxide (Tea Dye color).
  • On top of the Distress Oxide, apply some Green Brocade Opal Magic Wax with fingers.


  • Out of the same Elizabeth Craft Designs Lighthouse #1754 die set, die cut the 5 inner pieces of the lighthouse.
  • Using a finger dubber, shade the lighthouse with some Distress Oxide (Brushed Corduroy color).
  • On top of the Distress Oxide, apply some Green Brocade Opal Magic Wax with fingers.


  • Using some Kids Choice Glue, adhere the 5 small inner parts on the lighthouse.


  • On the light beige parts, apply some Festive Red Metallic Acrylic Paint. 
  • Decorate with a red fruit net on the bottom right corner.

Step 5: Frame
  • Using Elizabeth Craft Designs Happy Frame die set #1499, die cut 4 X the frame piece and cut to measure 5 1/2” X 5 1/2” once assemble. The paper used here is a piece with some small writings on neutral cardstock.
  • Using some strong adhesive, build the frame and adhere on the card.
  • On each corner, glue a stone.


I hope you enjoyed that tutorial ! Coming next is the list of products that were used here.


Tuesday, February 25, 2020

Mixed media products samples journal

Being in the process of rearranging my craft room, I decided to make a journal of all the products I have so that I can look up anything real easy when I need to instead of testing everything over and over again.  I find that Elizabeth Craft Designs dies set from the Planner Essentials series are perfect for the job. I'm looking forward to add all my other products...even thinking of making a journal for all my stamps...wouldn't that be great ?


Here's a look of some of my pages:

We first can find my Alchemy Waxes, those are the metallic ones even if they don't really show in those pictures, they are really metallic looking !


Each sample have a black side on the left and a white side on the right to show how each wax reacts depending if we use it on dark or on light colors.


I do have a lot of the Seth Apter Baked Texture Embossing Powder and you can not really tell by looking at the containers what they will do on paper after you heat embossed it. Those sample really come handy when I'm working on a project and looking for the right texture.


I also have a lot of pigmented powders that react with water in some amazing ways and although they often have an image on the bottle of the product, it doesn't do justice to the real thing.
The following are the Infusion Coloured Stains and they have a walnut pigment in each color that kind of gives a vintage look to the colors. It can expand as much as you like and you can stop it by sponging with a paper towel. I find those stains are really amazing and work magic for backgrounds.


Next are the Nuance Coloured Stain and I have to say that the Chartreuse color is just amazing and one of my favorite.


Brusho Stains have been around for ever, I just have a few  also really nice.


I have a large selection of Nuvo products and it fun to have them all lined up in my journal for me to look at ! Here some of those products. I still need to work on my Embellishment Mousse samples and my Drops samples.

First, I have the Glitter Markers and those are really glittery ! They have a kind of metallic look and they are pretty opaque to.


Those are my Aqua Flow Water Brushes and the pigments are so intense! I love working with them and you can water them down as much as you need or you can have they as intense as you want ! I have all the colors on those small cards and they are showcase as they come in there packaging of 3 Water Brushes.


Finally, those are my Nuvo Alcohol Markers. I didn't play yet with those but I do like the colors on the samples. As for the Water Brush, each tag present the 3 colors they come in the packaging.


Friday, February 21, 2020

A little mermaid for my little mermaid's birthday !


This morning I present to you a birthday card I made for my granddaughter who will turn 9 in March. 

Elizabeth Craft Designs has come out with a new collection of wonderful characters from Joset. Here's my take on the mermaid.

I hope you enjoy it !
Diane


STEPS:

Step 1 : Card base
  • Cut White Soft Finish Cardstock to 12” x 6”, score at 6” and fold for a 6” x 6” card.
  • Cut a 6" square out of some wood patterned cardstock. Die cut a stitched circle in the middle of the square using the second largest die from Elizabeth Craft Designs Stitched Circles #1116 dies set. 
  • Using the largest circle from the previous dies set, die cut on to a light blue cardstock. On the top part of the circle, draw some clouds with a finger dubber and some white PanPastel.
  • Die cut a border for the circle, using the largest and the third largest circles taped together, in the same patterned paper than the 6" square. Shade the edges of the border with  some Distress Oxide - Brushed Corduroy and a dubber applicator.
  • With a punch, create some  small black circles and adhere them on to the border, spacing them evenly like shown in the picture to create some screw around the porthole.

Step 2 : Ocean waves
  • Using some 100 lbs White Soft Finish Cardstock, die cut 3 times a wave patterned out of Elizabeth Craft Designs Ocean Edges #1755 dies set.
  • On 2 of the 3 borders, apply some Nuvo Embellishment Mousse - Coastal Surf color,  with a palette knife. Let air dry or use a heat gun. When it is dry, apply some Nuvo Glimmer Paste - Esmeralda Green randomly on the wave.
  • On the remaining wave border, apply some Nuvo Glacier Paste - Frostbite color.

Step 3 : The Mermaid

  • Using some 100 lbs White Soft Finish Cardstockdoubled with some Clear Double Sided Adhesive (on the front for the tail, the bras, the head band and the star,  and on the back for all the other pieces), die cut all the pieces Elizabeth Craft Designs Mermaid #1746 dies set.
  • Remove the release paper on the front of the tail, the bras, the head band and the star. Apply some  Cosmic Shimmer Gliding Flakes - Harvest Moon color and rub it in with finger until the pieces are all covered.
  • Using your favorite markers or ink medium, color the body, face and hair of the mermaid. Assemble like shown in the picture below.


Step 4 : Treasure Chest and Anchor
  • Using some 100 lbs White Soft Finish Cardstockdoubled with some Clear Double Sided Adhesivedie cut all the pieces of the chest and the anchor from Elizabeth Craft Designs Seaweed #1752 dies set.
  • Using some Distress Oxide - Vintage Photo and Brushed Corduroy colors, color the bottom and the top parts of the chest.
  • Color the contour of the bottom and the top parts of the chest and the anchor with Silver Mist #183 Nuvo Glitter Marker Pen.
  • On all parts, sponge some VersaMark Watermark Clear Ink here and there, don't cover completely. Sprinkle some Rocky Road Baked Texture Embossing Powder and melt with a heating tool.
  • Add dimension to the treasure itself with some Nuvo Gold Luxe Dream Drops and some Nuvo Golden Sunset Glitter Drops.


    Here you go, all left to do is to adhere the parts on the base of the card and you are all set. 
    Here are the products that were used on this project: