Sunday, January 28, 2024

I hope spring will be early this year...


Hello everyone ! I hope you are having a great Sunday ! Today I made a card with lots of summer in it. I just can't wait for the warmer weather to be here, and looking at the window, this is what I will see !


Here are the steps to make this cards:

Step 1: Card base

  • The card was made out of the Pastel ECD orange cardstock, a 12" X 12" piece, folded in half to make a 6" X 6" card;
  • A  Royal blue square, 5 7/16" X 5 7/16";
  • A Garden Party square of 5 3/8" X 5 3/8".
  • The Royal blue square and the patterned paper are both glued on top of the Pastel paper with double sided adhesive tape.


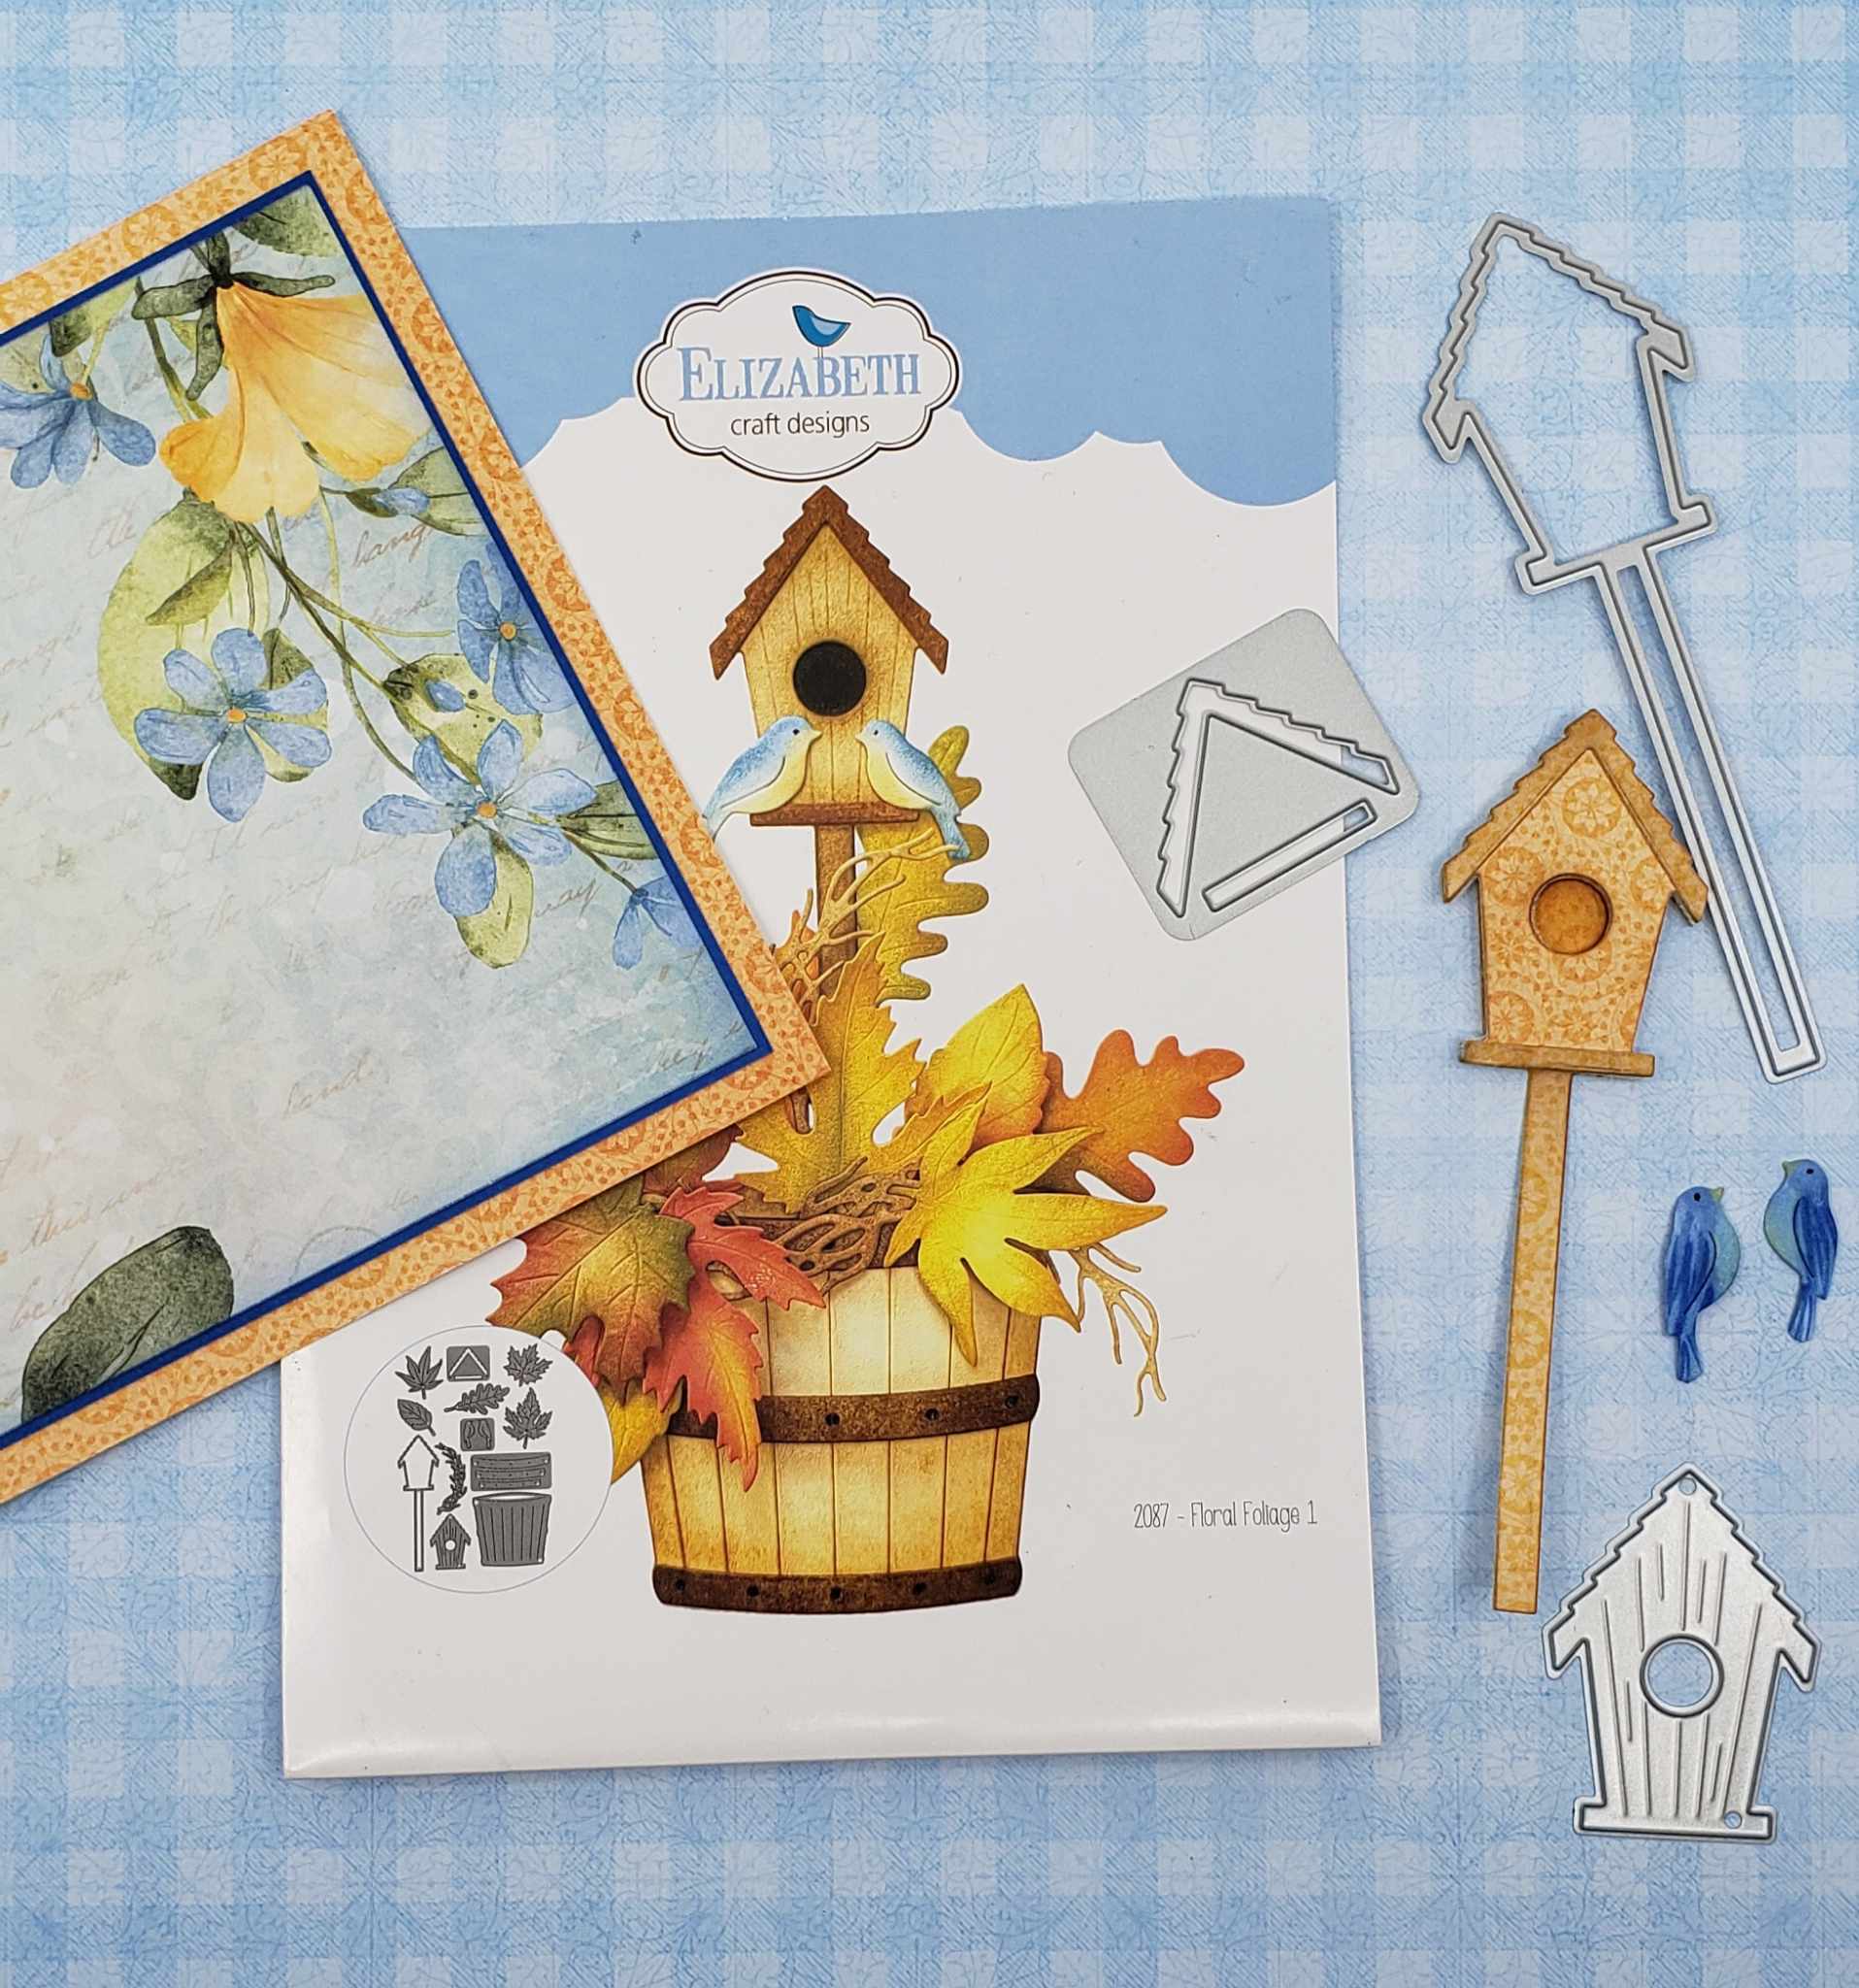
Step 2: The bird house and the birds:

  • Cut the bird house from the ECD Floral Foliage 1 #2087 die set, out of orange Pastel Paper;
  • Cut the 2 birds from the same set, in some White ECD Soft Finish Cardstock;
  • With some Distress Oxide a little bit darker than the paper, stain the edges of all pieces of the bird house;
  • With some alcool markers, color the birds and paint some Crystal stickles on the belly of each bird.


Step 3: The window:

  • Using the Postage Stamps #2026 from Annette Green Everyday Elements, die cut the large stamps die and the second biggest stamp die in White Soft Finish Cardstock;
  • Use some Blue Distress Oxide on the smallest of the two stamps and gently color it with a brush;
  • In the same set, cut the biggest rectangle and cut 4 of the smallest one to make the window;
  • From the Lace Border #2022 also from Annette Green, cut a border out of some orange Pastel Paper to make the curtain;
  • From the Fancy Flourishes from Annette Green also, cut out 2 times, the smallest flourish, using some ECD White Soft Finish Cardstock;
  • Cut a rectangle of clear plastic to make the window;
  • Adhere everything in place with glue.


Step 4: The flowers:
  • Using the Wild Flower 2 die set, cut out as many petals and leaves that you need to make enough flowers and foliage for the card;
  • Color the flowers using Copic markers  B21, B24, B26 and B28, punch a small hole in the meddle of each row of petals;
  • Insert some stamen in the middle of each flowers after shaping them;
  • Color the leaves using Copic Markers YG61, YG63, YG67 et G28, shape them and pinch the bottom of each leave.

Finishing the card:
  • Adhere the window on the right of the card, using dimension foam;
  • Put some leaves on the background on the left, insert the bird house using foam for dimension and add the flowers around it;
  • Add some more leaves to taste;
  • Add the flowers on the window and the birds with very small foam dots.


Here you go ! I hope you like that project and I wish you a very nice week !


Sunday, January 21, 2024

Getting organized with new dies, stamps and cardstock


Hello everyone,

This week I have been asked to share with you how I organise myself in my craft room. I hope this give you some ideas! My system is not perfect but it works well for me and I enjoy the process alot !


Happy day: receiving a new ECD order


When I receive an order from Elizabeth Craft Designs, after I jump up and down with joy for a while...this is what I do.

Die sets:

Step 1:

  • I cut in half a 8" X 12" magnetic sheet;
  • I take out the die set from the packaging and keep the plastic sleeves for other use (shaker cards, windows, etc.);
  • I take the dies carefully from the package and put them on 1/2 magnetic sheet;
  • I put the magnetic sheet with the dies in the presentation cardstock;
  • I put the magnetic sheet in an Avery Elle Extra Large Stamp & die Storage Pocket.
  • If there's a matching stamps set, I usually take them out of the plastic sleeve and and put it with its matching die set, it fits in the same enveloppe.


  • The enveloppes stands in plastic cases with the name of the designer or the theme on the front of the cases: Esther's Planner Sets, Devids & Art Journal Stuff, Christmas, etc., and I have my "Most-often-go-to" in one case where I can find my shapes, tags, pockets and most of Annette's dies set and stamps.


Step 2:
  • Once I'm done with repacking the dies sets, I die cut them about 10-15 times each set, and I put the die cuts in one photo plastic box per set;


  • I print the name and number of the set and I glue it on the side of the box;

  • Sometime I reuse some boxes with older sets that I don't use much anymore, I put the remaining die cuts in a Ziploc bag and take the name and number tag off the box.

Cardstock:
  • When I get a new pack of  patterned cardstock, I take out my Copic Markers and I try to find the best matches of colors to go with the cardstock;


  • When I decide what colors are the best, I make a card with all the colors and their numbers and I put it in my Creative Planner for further references.


  • I can also make a note card for Distress oxide colors that matches some specific cardstock packs.

Colored and shaped pieces:
  • Sometimes I just feel like coloring or shaping pieces and I have no particular project in mind or I colored and embossed to many pieces for one project, or the pieces didn't made it to the final projects, so I'm left with many usable pieces.
  • When the pieces are not to big, I can put them in a plastic case and label them with the content.


  • If they are to big like flowers, I make a box using the ECD Book Box die set. 
  • I print the name of the items in the box and glue it on the side of the Book Box.


  • Each boxes have some different content, here's an exemple with remaining pieces from my Christmas cards. 


  • Sometime I decorate the box on the top like the previous box, but sometime I don't so that I can pile them up on a shelf. On those ones, I might put a picture and decorate without going 3D on the cover.


  • Inside the box, I make a pocket and I write the informations that I need to know if I ever want to make the same thing again (used dies, stamps, colors, how it was shaped, etc.)  . Now that we have the great Devid's Art Journal Collector's Item set #2091, I use this to make the inside pocket and the card with the informations. It fits perfectly in the inside cover of the Book Box.


  • When I don't use the box anymore, I can change the name on the box and use it for something else.

This is my post for this week, I hope you enjoyed it and maybe you will find some useful ideas for you own craft room.

Have a great week !


Saturday, January 13, 2024

Can we give cards with flowers to men ?

Hello everyone ! 

This week, I'm trying to make some cards for Valentine's day and I find men cards are so hard to make. So here's my take on a man card. Let me know what you think !


Last week, I watch an Elizabeth Craft Design live with Reanna van Haren and she inspired me so much that I decided that I would try her technique on my card. So that is the result.

Here are the steps to make the card but you might want to tune in to Reanna's video following this link: Reanna's video


Step 1: Heart shape


  • Die cut a big heart or cut it by hand. (I used a very old die from ECD on this card);
  • Glue on some white die cuts of flowers, greeneries and branches (I used some left overs from other cards)


  • When satisfied with the result, apply some multi medium (here I used some matte one).
  • Let dry completely.


  • Once the medium is dry, apply some metallic acrylic paint (I used Tarnished Brass);
  • With a baby wipe, remove some of the paint on the surface of the die cuts.
  • Let dry completely.


  • With your finger, spread a little bit of pastel on the die cuts (here I used PanPastel, Ultramarine Blue)

Step 2: Card base:


  • Cut a black cardstock 12 X 6 and fold at 6 to get a 6 X 6 card;
  • Cut a white piece of cardstock 5 3/4 X 5 3/4;
  • Cut a patterned cardstock 5 5/8 X 5 5/8, here I used some Rustic Winter cardstock from The Art Journal Specials by Devid;
  • Put double sided adhesive on the back of each piece and adhere on the card.

Step 3: The bird


  • From Annette Green's collection, Layered Birds #2023, die cut all the pieces for the bird looking to the left;
  • With some Distress Oxide, color the bird (here I used some Scattered Straw and Frayed Burlap for the body, Prize ribbon, Blue Print Sketch, Rustic Wilderness and Black Soot for the rest of the parts);
  • With some glue, put the bird together.

Step 4 : Flowers and greeneries


  • Die cut 5 smallest and one medium one from the Floral set Floral 11 #1872 and 2 sets of leaves;
  • With a blender brush, color the center of the flowers with some Scattered Straw Distress Oxide;
  • Color the leaves with some different tones of Distress Oxide greens.
  • Using a ball stylus, shape de flowers and the leaves.

Step 5: Assembling the card


  • On this card, I used a lot of remaining greeneries from previous cards I made. When I make a card, I try out many different options and they dont always make it to the final project, so I have small plastic boxes (photo boxes) and I put all the ready-to-go die cut in them for futur use !
  • I had some branches that came handy to put the bird on, in that box, and I think it goes very well with the brownish background.
  • I put the bird on the card using some foam tape to give it a bit of dimension.

Here you go ! So what do you think ? Would a man be happy to receive this card at Valentine's day ?


Sunday, January 7, 2024

Birdhouse and flowers !

 Hello everyone,

This is my first official post as a DT member for Elizabeth Craft Designs. We are expecting a tone of snow this coming week so I thought I would create a summer card to help me through this one big storm !

I hope you like it !


Steps to make this card:

1- Card base:

The card mesures 5'' X 7''. On the front, it is scored and fold at 2 1/4 from the opening side.
Front of the card below:


The panels are first covered with green cardstock with a 1/8'' of margin all around.
The green panels are covered with patterned paper leaving a 1/8'' of margin between the green and the patterned cardstock.

Back of the card below:

2-Birdhouse and birds

All the part of the birdhouse and the 2 birds are cut from the ECD Floral Foliage 1 set #2087
They are colored with Distress Oxide: Birdhouse I used Mustard Seeds, Wild Honey and Frayed Burlap on the edges. The darker spots are with Frayed Burlap and Ground Expresso. The birds were colored with  a very light touch of  Blue Print Sketch, Festive Berries and some Wild Honey.
I put some foam dots to put the birdhouse and the birds on 3 D.

3- Flowers

Many of the flowers were leftovers from my Christmas cards and comes from different set. They were all colored with Distress Oxide, pale yellow tones and greens.


The finishing touch: 

I glued down everything with some Art Glitter glue, leaving the end of the branches loose. The bow on the birdhouse is also from my Christmas die cuts box and I believe it come from an old Easter set.

Here's a look at the final card:


Have a nice week everyone !!!


Wednesday, January 3, 2024

Dream Team 2024

I am so happy...no word can describe how happy I am ! I have been chosen to be part of Elizabeth Craft Designs Brand Ambassadors. It will be so amazing to work with all those talented people for 2024 !


Have a great day !
Diane

Tuesday, January 2, 2024

I'm back !


Happy New Year to everyone !

I am back with my creative blog and I hope I can inspire you to create or at least make you want to play with me. I have been away from my blog for 2 years but now I'm back !

So I wish you a very creative and fun year


Diane